Registering for a Class
Use this to help you register for your course!
Any student may register for any course by clicking here to open our course portal in a new window. If you are seeking a credential or license, you must complete a program application prior to enrolling in a course.
Login Procedures
To utilize the system fully, all prospective students must have a login and password. If you have a login, click Registration (login) at the top of your current screen.
Course Portal login link
When you click the login link, the following screen will appear.

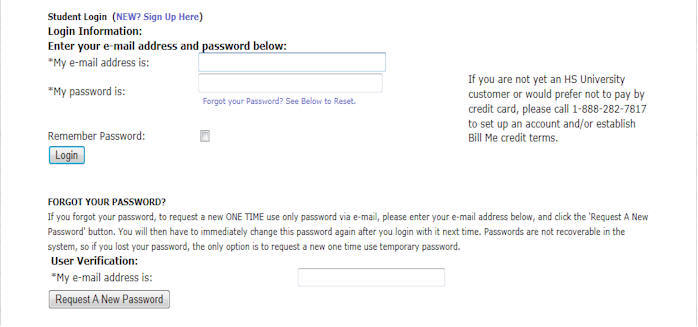
Figure 1 - Login Screen
To Login
Enter your email address and password and click on sign in.
NOTE: If you forgot your password you may click on the "click here" link to have it emailed to you. If you do not have a password, use new student procedures below.
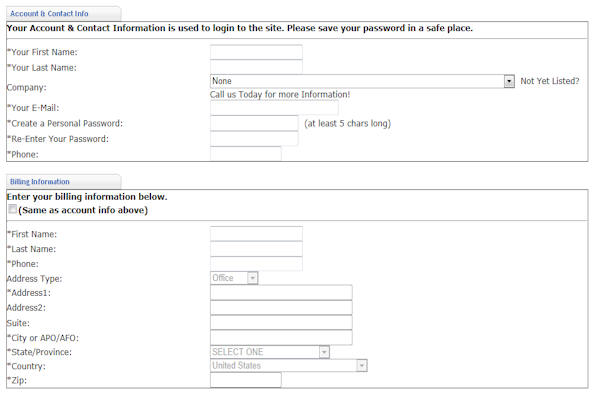
NEW STUDENTS: If this is the first time you've used our system, you must establish a login and password. To create a login, click on the "NEW" Sign Up Here link. The following screen will appear.
Creating your account: Creating an account will help expedite your registration process. Once your login account has been created, the system will remember your company and billing information for future registrations.
To complete the online account registration, you will need to complete 6 items. The following information is needed:
1. A student(s) name, and a billing contact name
2. Agency Name - This field lists all Head Start/Early,Head Start, Migrant/Seasonal and American Native/Alaska Native grantee and delegate programs in the US. If you are a "new" grantee or delegate and your agency name does not appear in the system, please call student services to be added immediately.
3. Your email address
4. A password that is at least 5 characters long
5. A contact phone
6. Billing Address if other than the one listed in the national Head Start system.
Once you complete the online account registration, you will be able to register for courses.
Online Course Registration
Before beginning, it is recommended that you use the course search feature to familiarize yourself with our online system. When you click on the course link or (back to course), the following screen appears.
Course Listing Screen
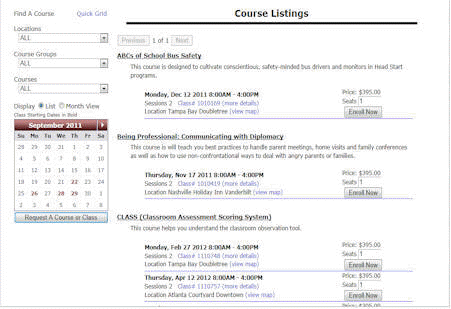
The course listing screen will provide students with:
- A listing of course names, descriptions, dates, times, prices, class numbers and locations
- Seat requests (Seats are automatically populated with "1", student can change to number of students attending)
- Monthly calendar that allows students to view by dates or change to monthly view next to "display".
- A filter to locate a class by location, course group, i.e., health, disabilities, etc, or by the course names.
- A quick grid that allows students to see courses listed by group without dates, times, pricing and location information.
To register for a class:
Step 1 - Click here to open course portal in a new window
Step 2 - Choose the course(s) you want to enroll into, add the number of seats
you want to reserve and click on enroll now
button. The shopping cart screen will appear.
Step 3 - Using the Shopping Cart
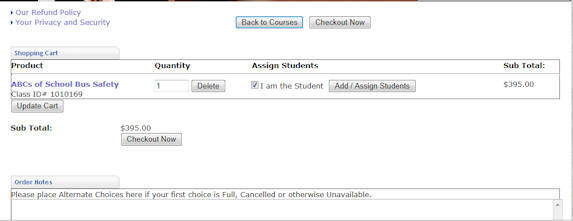
Figure 2 - Shopping Cart
The shopping cart screen allows you to assign seats and add students, confirm pricing, add order notes, view our refund policy and view information about privacy and security.
Adding Notes:
Students should use the notes section to inform the university of any special needs or requirements you may have. The online system takes up to 1 hour to consolidate with the University database. Sometimes a student may register online for a course and the course is full. Notes allow you to instruct student services of any alternate choices you have. Notes should be used to inform the university of any special assistance needs, such as diet, disabilities requirement or flight departure issues during your class.
How to enroll...
- Enroll now!
- About the programs
- tuition and fees
- PAYING FEES
- How to enroll
-
Forms...
candidate application - eligibility assessment form
- program handbook
- BILLING AUTHORIZATION FORM
- credential flyer
- License flyer
- Exam Process
FAQs...
Choose your program...
Over 99% of HS/EHS programs with HS University's credential or license do better in Federal On-Site Reviews.